


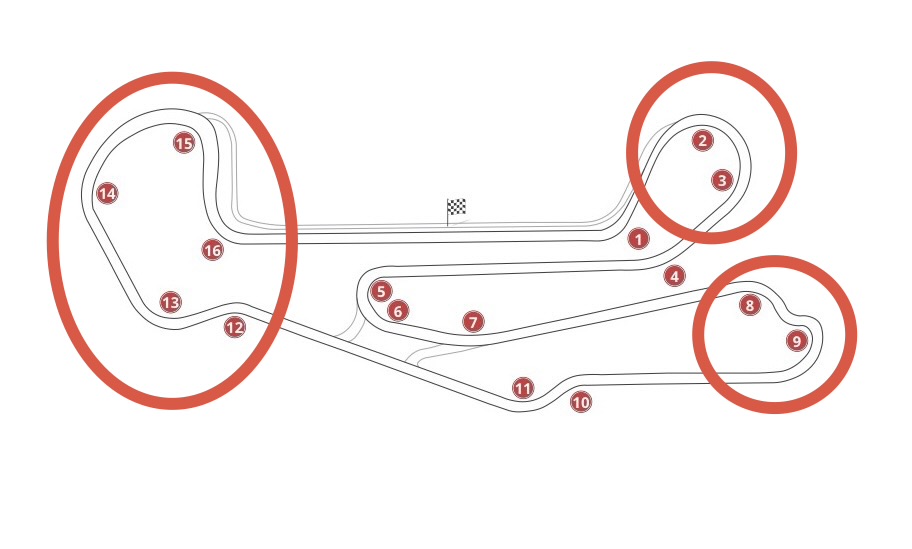
I recently mentioned I was at Barber Motorsports Park for a test, and after last week’s Barber vs. VIR poll, I decided to do a deeper dive into some of the key aspects to driving an incredible lap around Barber.
If you’ve been to this challenging 2.3-mile circuit before, you know it sits on a beautifully manicured piece of property, with many rolling hills and lots of challenging nuances as you traverse the park.
Although there are several unique and challenging corners to this circuit, here are a few of my key areas for getting a better lap at Barber.
-Turns 2-4
The theme for this set of turns is gaining and losing, for two very different reasons. Turns 2 and 3 combine to be one of most unusual corners you’ll find in the Southeast. It’s very reminiscent of the famed Carousel at Road America. However, this corner is more unique in that it has a tremendous amount of elevation, both gained and lost.
The challenge is to carry the proper entry speed up the hill and over the crest, into turn 2, allowing the momentum of the car to carry out to mid-track. That way, the car is ideally placed for an optimal exit through the high-compression area of turn 3.
The reason why this area stands out to me is that you spend so much time in this corner, and there can be a lot of time gained or lost, depending on how well you drive the entry and place the car to set up for a good exit from 3, since it leads onto a relatively long straightaway before the turn 5 hairpin.
-Turns 7-9
Turns 7, 8, and 9 are affectionately known as the Museum corner complex. This series of corners also has a unique elevation drop as you approach the famed Barber Musuem, which overlooks the track at turn 9. And, if you haven’t had a chance to visit the museum, it’s an absolute must while on site! There are so many historic race cars and motorcycles to enjoy there.
The entry to turn 7 is a bit blind, despite it being relatively flat, and it’s extremely fast as you turn in while focusing on a light brake-pedal pressure to carry maximum momentum through turn 7. Then, you brake once again over a crest as the road drops away toward turns 8 and 9 through the Museum corner.
The key here is to maximize entry speed through 7 while also maximizing exit speed out of turn 9, as this sets you up for another long run down the back straightaway (even though the back “straightaway” is not completely straight!).
-Turns 12-15
The key to this incredible series of turns is to maximize entry speed as you turn in for a blind corner 12, all while compromising your line on exit to get the correct radius and carry optimal momentum through turn 13, which launches you over a steep crest and makes the car very light at the top before you dive down into turns 14 and 15.
The reason why this series of corners is so tricky is that on first turn-in, it’s blind, and it’s mind over matter to carry optimal speed. Meanwhile, you must also have the discipline to place the car no more than mid-track on the exit of 12 to help optimize the entry to 13, which can be one of the highest risk/reward turns on the circuit. The car gets extremely light on the crest, and having your hands straight on the steering wheel is paramount, so you reduce the lateral load in the car as it gets light.
This series of corners, as one feeds into the next, comprises a majority of the back half of the circuit, and it can make or break a perfect lap at Barber.
Getting the optimal lap at Barber is always a challenge, and it’s one that keeps you coming back for more. I know that, for me, every time I complete a lap there, I feel like there’s another area I can optimize. This track has so many blind areas and combination corners that there’s always a new way to find time there.